The success of an implant surgery depends on the dentist’s skill and the quality of the surgical kit. Using a synchronized, genuine kit ensures precision from bone drilling to implant placement. My Auris adheres to this standard to provide optimal and safe treatment outcomes for all patients.
What is the Osstem Implant Kit?
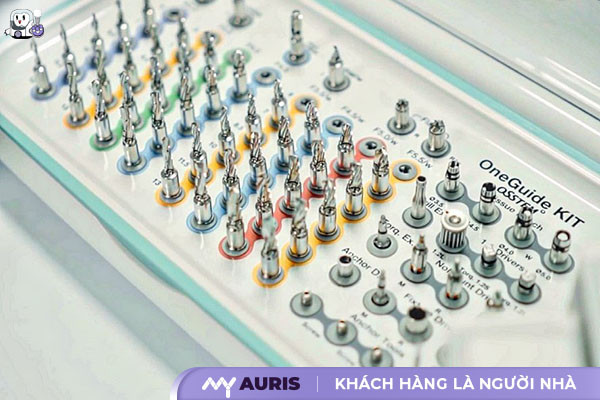
The Osstem Implant Kit is a specialized dental implant surgical instrument set, manufactured by Osstem Implant from South Korea. Osstem is one of the world’s leading brands in the field of dental implants. This kit is not a random collection of tools. It is a complete dental implant system, scientifically designed and standardized. Every instrument in the kit is calculated to work synchronously with each other and with the Osstem Implant fixture.
Essentially, this kit provides all the necessary Osstem dental equipment for a dentist to perform the core steps of surgery:
Bone socket preparation: Implant drills with precise dimensions and measurement marks help create a perfect space in the jawbone. This size is absolutely compatible with the size of the Osstem Implant fixture to be placed.
Implant fixture insertion into the jawbone: Specialized instruments help the dentist control the force, direction, and depth during implant placement. This ensures the implant fixture is in the most ideal position for osseointegration and subsequent tooth restoration.
Restoration process support: The kit also includes Osstem implant accessories for impression taking, healing abutment placement, and supporting the dental lab in fabricating accurate ceramic crowns.
Superior Benefits of Using the Osstem Implant System
The main benefits of this system extend beyond just the quality of the implant materials; they are also evident in surgical precision, treatment flexibility, and time efficiency. These are the core values that help every dental implant case achieve its ultimate goals: durable aesthetic restoration, natural chewing function, and patient satisfaction.
Exceptional Precision and Safety
Precision is the guiding principle in every dental implant surgery. A small deviation, even just a millimeter, can lead to failure, damage to vital anatomical structures, or affect the aesthetic outcome. The Osstem implant surgical kit is designed with the ultimate goal of absolute control over the bone drilling and implant placement process, ensuring maximum patient safety.
Diverse Solutions for Every Clinical Case
Each patient presents a unique clinical case with varying jawbone conditions, bone density, and restorative requirements. A superior dental implant system must offer enough options for the clinician to provide the best solution for each individual. The Osstem Implant kit excels at meeting this demand through an extremely diverse and comprehensive product system, from Osstem implant materials to Osstem implant accessories.
Optimizing Procedure and Implementation Time
In a busy dental clinic environment, efficiency is a crucial factor. Reducing chair time not only provides comfort for the patient but also helps the clinic optimize appointment schedules and increase productivity. The Osstem implant surgical kit system is scientifically designed to streamline the surgical procedure, enabling dentists to perform operations quickly, decisively, and effectively.
Key Components and Functions of the Osstem Implant Kit
Drilling Instruments Group
The drilling instruments group is the heart of the Osstem implant surgical kit. This is the first group of tools used in the surgical procedure, responsible for creating a perfect space in the jawbone for implant placement.
Initial Drill: This is the first drill to make contact with the jawbone. Its function is to create a pilot point and an initial path. The dentist uses this drill with a dental handpiece at a slow and controlled speed. It determines the position and direction of the future implant.
Guide Drill: After the initial drill, the guide drill is used to gradually widen the initial osteotomy. It helps ensure the drill hole follows the planned direction.
Sequential Drills: The Osstem system provides a series of drills with increasing diameters. The dentist will use these drills sequentially to widen the osteotomy until the diameter and depth suitable for the chosen implant size are achieved. Each drill has laser markings to control the depth. This process must be performed with continuous irrigation of physiological saline to cool the bone, preventing thermal damage.
Tap Drill: In cases where the jawbone is too dense, a tap drill will be used. Its function is to create threads inside the osteotomy. These threads perfectly match the threads of the implant fixture, making implant placement easier and increasing primary stability.
Measuring and Verification Instruments Group
After the osteotomy is created, the measuring and verification instruments group plays a role in re-validating all parameters. These are quality control tools used during the surgery itself. Using them helps the dentist ensure that the foundation for implant placement is perfect, thereby preventing complications and the risk of implant failure.
Depth Gauge: This is a simple yet extremely important instrument. After drilling, the dentist will insert this gauge into the osteotomy. The gauge has markings corresponding to the length of the drills and implants. In this way, the dentist can 100% confirm whether the depth of the osteotomy is exactly as planned. This helps avoid situations where the implant is placed too shallow or too deep, which could affect vital anatomical structures.
Parallel Pin/Direction Pin: When placing multiple implants simultaneously, ensuring they are parallel to each other is crucial for future crown fabrication and tooth restoration. After drilling the first hole, the dentist will insert a direction pin into it. This pin acts as a visual landmark, helping the dentist accurately drill subsequent holes parallel to the first.
Torque Wrench: This device controls the insertion torque when placing an implant into the jawbone. Each bone type (soft, medium, hard) requires a different optimal torque. The torque wrench allows the dentist to pre-set a force value (in Ncm). When tightening the implant, if the torque reaches the set threshold, the wrench will click and not tighten further. This ensures the implant has ideal primary stability without creating excessive pressure on the bone, a common cause of failure and bone resorption.
Restorative and Supportive Instruments Group
Implant Driver/Mount: This instrument is attached to the torque wrench or handpiece. One end connects to the implant, and the other connects to the wrench. Its function is to transmit the rotational force from the wrench to place the implant fixture in the correct position within the jawbone.
Healing Abutment: After implant placement, the healing abutment is screwed onto it. It has a round shape, protruding slightly from the gum. Its function is to guide the surrounding soft tissue (gum) to heal, creating an aesthetic gum contour, exactly like a natural tooth neck. It is kept in place for several weeks or months depending on the osseointegration process.
Impression Coping: Once the implant has stably osseointegrated, the healing abutment is removed and replaced with an impression coping. The dentist will take an impression of the patient’s dentition. The impression coping will accurately record the position, angulation, and depth of the implant within the jawbone on the impression model. This model is then sent to the dental lab for technicians to fabricate a ceramic crown with absolute precision.
Removal Tools: In some rare cases where an implant or restorative components need to be removed, the Osstem kit also provides specialized tools to perform this safely, conservatively, and with minimal damage to the surrounding tissues.
Precise Dental Implant Procedure Using the Osstem Kit
A standard dental implant procedure using the Osstem kit takes place in a sterile environment at a dental clinic. This procedure requires high expertise from the dentist and the support of modern Osstem dental equipment. Below are the detailed steps.
Step 1: Examination, X-ray Imaging, and Treatment Planning This is the foundational step that determines 50% of the success. The dentist conducts a general oral health examination of the patient. Next, the patient is prescribed dental X-rays, especially 3D Cone Beam CT scans. This film provides a three-dimensional image of the jawbone, allowing the dentist to accurately assess bone density, height, thickness, and the position of vital anatomical structures such as nerves and maxillary sinuses.
Based on this data, the dentist uses specialized software to create a virtual implant placement plan. This plan determines the precise position, angle, depth, and most suitable size of the Osstem implant fixture. A surgical guide can be fabricated from this plan to ensure absolute precision during the drilling process.
Step 2: Surgical Preparation Sterility is vital to prevent infection and implant failure. The operating room is prepared according to medical standards. All medical instruments in the Osstem Implant kit are sterilized and aseptically packaged. The dentist and assistants wear surgical attire. The patient is instructed to rinse their mouth with a specialized antiseptic solution. The dental chair, surgical light, and related equipment are all prepared.
Step 3: Local Anesthesia The dentist administers local anesthesia to the implant site so that the patient does not feel pain or discomfort during the entire surgical procedure. The anesthetic takes effect quickly and is sufficient to complete the procedure comfortably.
Step 4: Jawbone Drilling Following the Osstem Kit Sequence After anesthesia, the dentist makes a small incision in the gum to expose the jawbone. This is where the Osstem kit plays its central role. The dentist will use a dental handpiece along with the implant drills in a strict sequence of increasing sizes, from smallest to largest.
- Pilot drill: Creates an initial pilot hole, determining the implant’s position and direction.
- Intermediate drills: Gradually widen the osteotomy to the diameter suitable for the selected implant fixture. This process is performed at a slow rotational speed with continuous physiological saline irrigation to cool the bone, preventing thermal damage to bone cells.
- Final drill: Shapes the osteotomy for the last time to achieve a perfect size, ready for implant placement. This operation requires absolute precision, depending on the expert’s skill and the quality of Osstem implant materials.
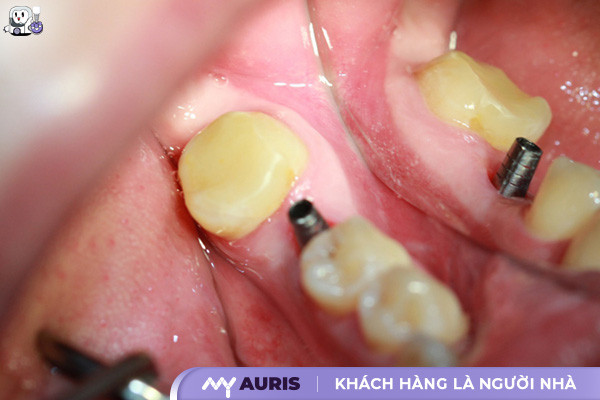
Step 5: Osstem Implant Fixture Placement into the Jawbone The dentist uses a specialized dental implant insertion tool from the kit to pick up the implant fixture from its sterile vial and gently place it into the prepared osteotomy. The implant fixture is screwed into the jawbone using a handpiece or manually with a specialized wrench. The insertion torque is strictly controlled by a torque measuring device to ensure the implant has good primary stability without applying excessive pressure to the bone.
Step 6: Wound Closure and Completion The dentist places a small screw (Cover Screw or Healing Abutment) onto the implant for protection. Then, the gum flap is carefully sutured with dental sutures. The dentist will perform a final check, instruct the patient on post-surgical oral care, and prescribe medication.
Osseointegration and Post-Implant Restoration Phase
The surgical procedure is only the beginning. The success of a dental implant case also depends on the subsequent healing and restoration phase.
Osseointegration Phase After implant placement, the body needs time for the jawbone to grow and bond firmly to the implant surface. This process is called osseointegration, the foundation for long-term stability. Thanks to Osstem’s exclusive surface technology, this process usually proceeds smoothly, taking approximately 3 to 6 months depending on bone quality and the patient’s individual condition. During this time, patients must strictly follow the dentist’s instructions and attend follow-up appointments to check the implant’s stability. Avoiding strong forces on the implant site is crucial to not hinder the osseointegration process.
Ceramic Crown Restoration Phase Once the implant fixture has firmly integrated into the bone, the dentist will proceed with the aesthetic restoration phase.
Abutment Placement: The dentist will perform a minor surgical procedure to expose the top of the implant and replace the healing screw with an abutment. This is an intermediate connector, linking the implant fixture in the bone to the crown above.
Impression Taking: The dentist takes a precise impression of the abutment and adjacent teeth. This impression can be taken with traditional materials or with a 3D digital scanner.
Crown Fabrication at the Dental Lab: The impression data is sent to the dental lab. Here, technicians will use CAD/CAM technology to design and fabricate a ceramic crown that perfectly matches the color, shape, and size of the lost natural tooth.
Permanent Crown Placement: At the final appointment, the dentist will try the crown in the patient’s mouth, checking the bite and fit. Once everything is perfect, the crown will be permanently cemented onto the abutment, completing the tooth replacement solution.
Osstem Implant Surgical Kit Price
The price of an Osstem Implant kit is determined by a combination of many components. Understanding these factors is the first step in accurate budgeting. The kit IS manufactured by Osstem with various options, serving diverse treatment purposes.
Kit Type and Implant System: Osstem offers various types of kits. Each type has its own price.
- Surgical Kit: This is the most basic and common kit, containing dental implant instruments such as implant drills, wrenches, and depth gauges. The price will vary depending on the implant system it supports, such as TS, SS, or MS systems. Each system has a different design and usage philosophy.
- Prosthetic Kit: This kit contains specialized medical instruments for the impression-taking and crown placement stages on the implant. It is usually purchased separately or included in a comprehensive set.
- Master Kit: This is the most comprehensive kit, combining both surgical and prosthetic instruments. It may include instruments supporting advanced Osstem implant techniques such as sinus lift or bone grafting. Therefore, this is usually the kit with the highest investment cost.
Which Osstem Implant Kit is Best?
Determining the right Osstem implant surgical kit depends on accurately evaluating four key factors. Any clinic can conduct this analysis independently to make effective dental supply purchasing decisions. This process ensures the chosen kit meets actual needs.
Identify the Primary Osstem Implant System in Use
Osstem develops various implant lines, each with its own design and treatment philosophy. Surgical kits are specifically designed for each system. You (addressing the audience respectfully) need to clearly identify which system your clinic primarily works with:
TS System: This is the most popular system, featuring a tapered screw design and effective self-tapping capability. If your clinic frequently performs basic implant placements for posterior or anterior teeth with good bone quality, the Taper Surgical Kit or OneCAS Kit is a fundamental and necessary choice. The kit contains instruments for the TS implant placement procedure.
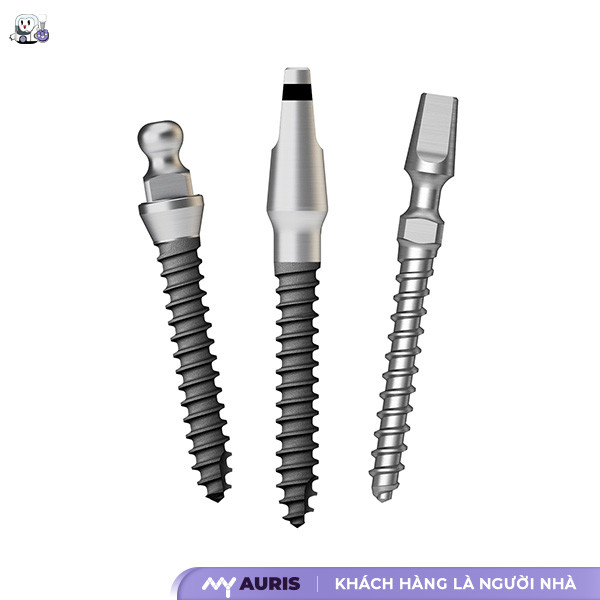
MS System: Designed for cases with narrow jawbones or limited space. If you frequently encounter patients with thin alveolar ridges or need to place implants in the lower anterior region, equipping an MS implant kit is essential.
Other Systems: Lines such as US (Ultra-Wide) for special cases also require corresponding kits.
Assess the Experience and Skills of the Dental Team
Dentists new to implantology: Should start with a basic, well-guided kit like the Taper Surgical Kit. This kit features color-coded drills, which helps minimize errors during the implant placement procedure.
Experienced dentists: May require more advanced and specialized kits to handle complex cases, such as the LAS Kit (lateral sinus lift), CAS Kit (crestal sinus lift), or Esset Kit (bone expansion). Proficiency with these medical instruments allows for a wider range of complex tooth replacement solutions.
Analyze Common Clinical Cases at the Clinic
Review patient records from the last 6 months to determine which types of implant cases you perform most frequently:
- Simple implant cases, good bone quality: A basic surgical kit is sufficient.
- Implant cases requiring sinus lift: Investing in a CAS Kit or LAS Kit will yield high returns.
- Implant cases in thin bone areas: An Esset Kit or an MS implant kit is necessary.
- Immediate implant placement after extraction: The kit should include instruments that support this procedure.
Embrace Digital Dental Technology Integration
Digital dentistry is an inevitable trend. If your clinic has already invested or plans to invest in Cone Beam CT (CBCT) dental X-ray machines and 3D printers, the OneGuide Kit is an excellent choice.
The OneGuide Kit is used in conjunction with a 3D-printed surgical guide, designed from the patient’s CBCT data.
Advantages: Maximized precision, minimized soft tissue invasion, reduced surgical time, and simplified subsequent tooth restoration processes. The implant procedure relies on the quality of the kit and surgical guide, providing superior safety.
Care, Cleaning, and Longevity Maintenance of the Osstem Implant Kit
Step 1: On-site Pre-cleaning
This action should be performed immediately after instruments are removed from the patient’s mouth. The purpose is to remove large debris such as blood, saliva, and soft tissue before they dry and harden.
Use a gauze or soft cloth dampened with distilled water to wipe down the instrument surfaces.
For implant drills, a soft nylon brush can be used under gently running water to remove bone fragments and tissue adhering to the flutes.
Absolutely do not use metal brushes or abrasive materials. They can damage the surface coating and size markings on the dental implant instruments.
Step 2: Soaking in Enzymatic Solution
After preliminary cleaning, instruments should be immediately immersed in a specialized enzymatic detergent solution for medical instruments.
Dilute the solution according to the manufacturer’s instructions.
Submerge all instruments, ensuring the solution covers all surfaces.
Soaking time usually ranges from 10 to 30 minutes. Enzymes will break down residual proteins and organic matter, making subsequent scrubbing easier and more effective.
Step 3: Detailed Manual Scrubbing
This is a crucial step to ensure every nook and cranny of the instruments is clean.
Use a set of specialized brushes of different sizes to clean each type of instrument. Pay special attention to the grooves and flutes of drills and the joints of the instruments.
Scrub each instrument under running distilled water. This helps rinse away debris softened by the enzymatic solution.
Visually inspect each item under good lighting, ensuring no visible stains remain.
Step 4: Rinsing and Drying
Complete removal of the detergent solution is mandatory to avoid chemical residue.
Thoroughly rinse all instruments again with distilled or deionized water.
Dry the instruments immediately to prevent water spots and the risk of rust. Use a medical-grade air gun or a clean, lint-free cloth to dry them completely.
The Osstem Implant kit is a precise surgical instrument system that supports the entire implant placement procedure. Proper selection, use, and maintenance of this kit are core responsibilities of the dentist. It ensures maximum working efficiency and patient safety, directly impacting the success of the treatment and final restoration.